
Monday, December 2, 2013
Thursday, November 7, 2013
Turn signal cancel / rear axle seal
Yesterday I decided to replace the passenger side rear axle seal. It's been leaking since I put the rear end in. Just a little but enough to put gear oil on the driveway and make a mess on the inside of the tire. I had purchased an axle seal a while back, assuming that the rear end was out of a 'sedan'. However when I pulled the old one out it wasn't the same size. After some research I determined that it was actually out of a Ranchero. The rear bearings and axle seals are bigger. Since none of the local parts houses had one I had to make a run to Escondido to pick one up at C&G auto. The new seal was a snap to install.
I also bought a turn signal cancel switch since the one that was in the car was broken. Left hand turns never cancelled. The one I purchased has 2 wires and in reading I wasn't sure it was the correct one, however it was so after removing the steering wheel I pulled the old one and soldered in the wires. The retainer clip was tough but I finally got it installed. Works great.
I also bought a turn signal cancel switch since the one that was in the car was broken. Left hand turns never cancelled. The one I purchased has 2 wires and in reading I wasn't sure it was the correct one, however it was so after removing the steering wheel I pulled the old one and soldered in the wires. The retainer clip was tough but I finally got it installed. Works great.
Monday, November 4, 2013
New motor mounts installed.
My new motor mounts came in so I installed those. Ya gotta love old cars. Only about 15 minutes to install both sides! I did a bit more research on my distributor, engine combination (1971 Ford Torino points type distributor in a 1975 Ford Granada engine) The manuals say to use the 'sticker' to determine the correct initial timing, however since the engine didn't come in the car, no sticker. I searched the internet but there isn't much info. Since the engine is a 1975 Ford had just started with the smog stuff. It originally had a 'duraspark' ignition but since that was swapped out I wasn't sure what I should set the timing at. I had played with using manifold vacuum to set it and found that it was setting is above TDC. I did find some references of setting timing to 0 TDC so figured I would give that a try. The motor starts better now and the 2500 rpm vibration has reduced. Guess I will stick with that for a while.
I ordered a turn signal cancel part for the steering column, hopefully I can get that installed this week. I also need to install the passenger side rear wheel seal as it's leaking just a bit.
I ordered a turn signal cancel part for the steering column, hopefully I can get that installed this week. I also need to install the passenger side rear wheel seal as it's leaking just a bit.
Friday, October 18, 2013
A few more updates.
I decided to change out the points, condenser and rotor a while back, nothing wrong with them just figured since I didn't know how old they were, I would change them. I had considered changing over to the Pertronix (electronic) ignition but thought I would save a few bucks (mistake on my part). Anyway about 2 weeks after I switched, I was taking a short trip around the neighborhood and suddenly the engine started to mis. Nothing bad just a slight mis, however it kept getting worse until it got to the point I wasn't sure I would make it home. I struggled and finally made the driveway. It felt like the car was running out of fuel, so I decided to change the fuel pump as again it was looking like it may have been the original 75 pump. I ordered one along with a new 'clear' fuel filter to prefilter the pump. Those got here in a few days and I swapped them out. I tried to start the car and it would turn over and try to run but then stop. I was getting fuel but still wouldn't start. No backfire just wouldn't run. I had rebuilt the carburetor a while but but I wasn't really happy with the end result. The Carter YFA that was on the engine was the original carb and was set up for 1975 standards. (smog stuff). I did some searching on-line and located a 'factory rebuilt' YFA for $85.00 (good price!) on ebay. I ordered it and got it about a week later. Nice carb! rebuilt in about 1985 or so and still in the vacuum sealed package. I installed it but the car still wouldn't run! I came back in and did some searching on the internet, I finally found a "model A" forum and a member was describing the same symptoms I had with my engine. He fixed his by replacing the 'condenser'. Since I had kept my old ones I went out and swapped the 'new' condenser and put the old one back in. She fired right up!!!! I came back inside and ordered the Pertronix ignition system. About a week later I got it installed and now everything runs great! No misses, no stumbles, smooth idle, choke works great, no EGR port on the front of the carb, (that was left open and was always a concern!).
I also ordered a new set of motor mounts. They should be here next week. I am still getting my 2500 and up RPM vibration. Based on the squished appearance of the old ones my guess is, again these are original parts that have never been replaced.


Monday, July 29, 2013
Quick update
Just a quick update.
I need to take some photos to update some of the things I've done lately.
1. added a snap tonneau cover. (the car had the snaps and this just helps cover them up as there is no way to remove them without leaving holes.) I made this myself with tonneau material I found on the internet and snaps. It came out better than I expected.
2. finished up the door panels (they look great!)
3. changed out the exhaust manifold gasket. Broke one of the bolts but there was enough sticking out I could use vise grips to remove it. There was virtually nothing left of the old gasket. I replaced all of the bolts with grade 8 bolts and internal tooth lock washers. The new gasket got rid of most of my 2000 / 2500 rpm vibration! And the engine idles smoother. No exhaust smell in the passenger area either.
Tuesday, May 28, 2013
New door panels
My old "tuck and roll" door panels were starting to look pretty sad. The PO had removed the 'plastic liner' from the door when they installed the panels and the rain got to the fiber board pretty bad. They kinda sagged in the middle and were really looking ragged. I had read an article on replacing the door panels. LINK
I purchase some 'white board' from Lowes, the kind of stuff they use to make marker boards with and turned the 'white' side towards the outside to help with moisture control. Then I made the trip to Joannes. They had the 'head liner foam' in stock and so I started looking for some vinyl to cover them with. I stumbled across some 'costume' material that just 'said' USE ME !! So I bought a couple yards and went to work.
Here's some pictures of the 'white board' and the finished panel. I will take some of it installed and post later.


Wednesday, May 15, 2013
I had some time last weekend to pull the tailshaft extension housing off the C4 automatic. I knew the bushing was bad as the drive shaft had some play on the transmission end. It really wasn't that big of a deal. About 2 1/2 hours for everything. The old bearing did show wear so it was about time. I also changed the seal (again). While I had the cross member out I modified the 'homemade' C4 adapter that the PO had made for the trans. This involved griding down what was left of the downward facing angle iron that was put there to 'strengthen' the mount. It wasn't really necessary as the plate portion was quite strong. It just hungdown and looked ugly. Anyway all back together and it appears it fixed a slight 'cluck' I was hearing when I shifted from reverse to drive.
Thursday, May 2, 2013
Replaced the carburetor to manifold gasket yesterday and also changed the mounting bolts as I got the feeling they were a bit too short. It appears to have helped fix the 'missing' at idle. The engine now purrs like a kitten!
Still chasing the 2000 + vibration problem. I did some reading and it appears that there is a bushing in the C4 transmission extension housing that the driveshaft yoke rides in. Thinking back to when I changed the seal (which is still seeping by the way.) that there was some play in the shaft. I ordered a new bushing and seal today (12.00 or so including shipping.) and will change it out. Looks like I will have to pull the trans extension housing to get to it. Hopefully not that big of a deal.
We shall see.
Tuesday, April 23, 2013
Well a few more additions:
I installed a pair of Monroe air lift shocks on the back. I did this for two reasons. 1. the old shocks were worn out and needed replacement anyways, and 2. I could raise the rear just a bit to give the car a bit of a 'rake'. It looks much better and rides much nicer.
I installed a voltmeter and also got the oil pressure gauge hooked up. The car originally only had 'idiot' lights for both so at least now I can see what is really going on.
I also developed a slight leak in the passenger side rear axle. So I found a new seal on ebay and bought it. Should have it this week so will tackle that problem next.
I still have a slight vibration at around 2000 rpm. It appeared the tail shaft on the trans could have been hitting the cross member so I put a couple spacers under the mount to raise the trans. It helped but I'm still feeling the vibration. Will have to try to figure that problem out.
Saturday, April 13, 2013
I've accomplished a few things over the last few days.
I got the grill and bumper re-installed after replacing the harmonic balancer and electric fan. New fan works great runs at about 1/4 of the temp gauge all the time now. No overflow or leaks from the radiator.

I also got the roof painted so now the car is all one color!

I re-installed the chrome bed trim around the rear window so all of my trim is now in place

Once the paint is fully dry (normally takes 24 hours) I will wash the whole car and start work on the bed. I did get the first aluminum cross support installed the other day (the rear most one). Now I need to pop rivet it in place. Also got to try out the rust eliminator paint. It appears to have worked but will know more when I prime the spots I tried it on.
Friday, April 5, 2013
Well UPS dropped off the new (rebuilt) harmonic balancer this afternoon. It looks great! I thought about putting off installing it till tomorrow but decided to take the few minutes to do it today. Everything went easy so I pulled the car around front (long story but the neighbor smokes and loves to sit and watch EVERYTHING I do.) and installed the new 14 inch electric fan! Again everything went smooth. Took it out for a quick test drive and the balancer seems to have helped with the 2000 to 2500 rpm vibration. Next step is to check motor mounts and make sure exactly what was done when they put the engine in. Tomorrow I will re-install the front rock shield, grill and bumper.


Friday, March 22, 2013
problems
I ran into a 'glitch' with the new harmonic balancer. Before I pulled everything apart I did a quick measurement and discovered the HB on the car is 7" in diameter and the new one is only 6". So I called the Damper Doctor and he said to go ahead and ship both back to him and he will rebuild mine. Since this project was going to be done in the front of the house I had hoped to not have it take more than a few hours. So I pulled the car into the driveway as far back from the street as I could and went to work. About 2 hours later I had the radiator and balancer off the car. I went ahead and cleaned up the radiator for when I re-install it and also cleaned up my old HB. Should only take a few days so with shipping etc I figure by the end of next week I should get it back.
Here's a picture of both the old and the new balancers.

Also here's a close up of the old balancer with the part number visible. Now I see why I couldn't find it when I was looking for it. It's on the inside (towards the engine)!

Here's a picture of both the old and the new balancers.

Also here's a close up of the old balancer with the part number visible. Now I see why I couldn't find it when I was looking for it. It's on the inside (towards the engine)!

Thursday, March 21, 2013
New balancer is here!
UPS just dropped off the new (rebuilt) harmonic balancer from Damper Doctor. I'm surprised how good it looks. Appears to be a brand new one rather than rebuilt.
Hopefully tomorrow I can get it installed and see if my vibration problem goes away!


Hopefully tomorrow I can get it installed and see if my vibration problem goes away!


Rear tires, new electric fan
Last week I took the Ranchero down to the local tire store and had them put the 185/80r13's back on (give the car a bit of a boost in the rear end and also helps to keep the rpm down a bit lower. I also ordered the new 14 inch electric fan and the harmonic balancer.
Today I pulled the front bumper and lower valance (rock shield) so I can modify it to fit the new electric fan. Fortunately the PO (previous owner) had already cut the core support so the radiator could be moved forward just a bit. Since the old mechanical fan was so small (12 inches) and probably wasn't working that well, I went ahead and removed it. The new 14 inch fan is quite a bit larger and covers most of the radiator surface.
Hopefully the harmonic balancer will get here today and tomorrow I can pull the radiator so I can get to the front bolt on the HB. I'm hoping my compressor has the poop to power the impact wrench enough to get that bolt off! If not then 'plan b'.
I took a few photos of the modification that was done to slot the radiator core to move the radiator forward.
passenger side

drivers side

drivers side

passenger side

old harmonic balancer and distance from mechanical fan to radiator

Need to cut front rock shield for new 14 inch fan. This is with the old 10 inch fan.

Monday, March 11, 2013
1st coat of paint on tailgate
The rains stopped and I was able to finish up the 1st coat of paint on the tailgate. Pretty happy with the results considering it's a 'rattle can' paint job.

I took a quick photo of the drivers side of the car. The area in the forward part of the front door is going to need quite a bit of work but I'm still wanting to get one color on the whole car. Now just the passenger side rear quarter and the roof are left. Hopefully I can get them both done this week.


I took a quick photo of the drivers side of the car. The area in the forward part of the front door is going to need quite a bit of work but I'm still wanting to get one color on the whole car. Now just the passenger side rear quarter and the roof are left. Hopefully I can get them both done this week.

Friday, March 8, 2013
primer
I got the roof, tailgate and left rear quarter prepped and in primer just before the rain started. It's been raining the last few days and looks like it will be throughout the weekend.
I still need to do some additional bondo clean up to fill some of the 'cracks' that were left so will work on that next week. Once everything looks good I will do a light sanding of the primer and spray the color on. Then the whole car will be one color!
Looks like I will be ordering the new harmonic damper, and electric fan next week. Then I need to take the rear wheels off and get the 185/80r13's mounted that were on the car originally. They are in decent shape and since you can't get that size any longer I will put them on. Should help compensate for the low rear end also.
I will post some pictures when the sun comes out again!
Thursday, February 28, 2013
Replaced C4 speedo driven gear
Since changing the rear end from the Pinto 2.73 ratio to the Falcon 3.50 ratio my speedometer has been way off (too fast!) So I ordered a 21 tooth driven gear the other day. It came in the mail yesterday so I pulled the old one out this morning and replaced it.
The process was pretty simple, remove the bolt and retainer that holds the speedometer cable into the tailshaft of the trans and pull, it came right out. The one that was in it was 17 teeth (tan in color) and quite worn. I removed the small retainer clip with a screwdriver and installed the new (red in color) 21 tooth gear. Pushed it back into the housing and reinstalled the bolt that holds the retainer. All in all about 5 minutes (took longer to jack the car up!).
Took it for a test drive and the speedometer still shows about 5 mph faster than I'm going (checked with a local speed trap sign). I figure that's close enough and since I'm going to be changing the rear tires to a taller tire size it should compensate in the correct direction.
Tuesday, February 26, 2013
last couple days work.
Started installing the dzus fasteners in the rear bed shock cover. Still have more to install but so far they are working (and looking) good.
Painted the inside of the hood flat black.
Removed the old 'car alarm' that didn't work.
Began re-wiring the electric fan but discovered the fan doesn't work. I will pull it out when I'm replacing the harmonic damper next month.
Painted the inside of the hood flat black.
Removed the old 'car alarm' that didn't work.
Began re-wiring the electric fan but discovered the fan doesn't work. I will pull it out when I'm replacing the harmonic damper next month.
Tuesday, February 19, 2013
Bondo work!
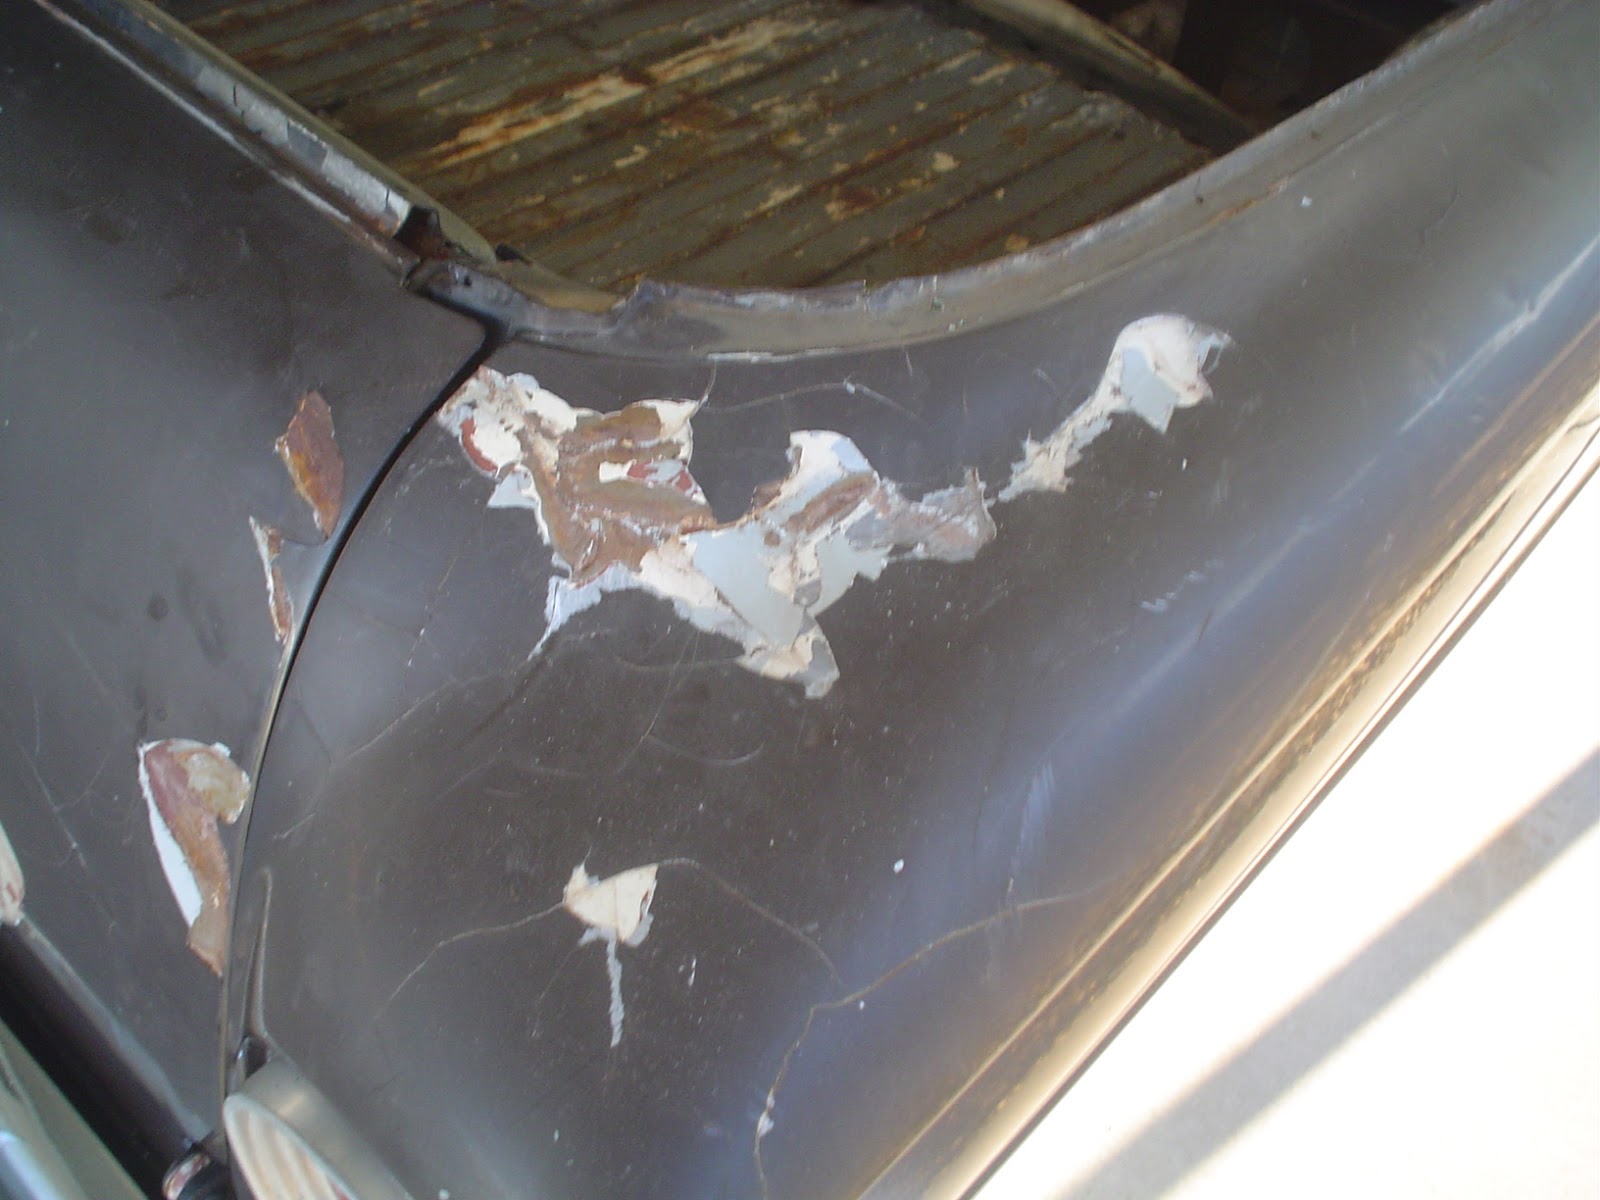
Here's some early photos to give you an idea of the condition of the paint on the car.
It had been painted many years ago by Earl Sheib. They covered the original 'Corintian White' with a thick layer of bondo (to hide the dings and some of the rust!) then painted Coco Brown. I'm sure this was considered a 'high end" Earl Sheib job but over the years the bondo cracked and chipped. Rather than 're-invent' the wheel I am just doing a 'fix and paint to one color' job. I don't have the resources or funds to really get into a complete top end paint job so I'm experimenting. Anyway here's some photos of what I'm starting with.


It had been painted many years ago by Earl Sheib. They covered the original 'Corintian White' with a thick layer of bondo (to hide the dings and some of the rust!) then painted Coco Brown. I'm sure this was considered a 'high end" Earl Sheib job but over the years the bondo cracked and chipped. Rather than 're-invent' the wheel I am just doing a 'fix and paint to one color' job. I don't have the resources or funds to really get into a complete top end paint job so I'm experimenting. Anyway here's some photos of what I'm starting with.


Interior photos
The interior of the car is actually in pretty good shape. Carpet is okay, seat is alright also. The previous owner at one time replaced the stock interior with black tuck and roll. Looks nice but a bit hot in the summer! Steering wheel is an after market 'Grant' wheel. The instrument cluster has been replaced with one from a 63 Mercury Comet. It's much nicer than the stock Ranchero one in my opinion. I've also added a "Sun" tach so I can watch the RPM's. Since the car has a 3.50 gear ratio with a C4 automatic it's not much of a freeway cruiser!


"New" rear end
During the 'test drive' of the Ranchero I was hearing a 'click, click, click' coming from the area of the rear end. I assumed it was u-joints of which I was partially correct. I replaced both u-joints, which were worn badly, however the clicking was still there. Since the click was equal to the rotation of the wheel I figured it had to be the ring or pinion teeth had a chip. I had been told the rear axle was from a 75 Ford Granada however once I had it out I determined it was actually a 77 / 78 Ford Pinto / Bobcat rear end. The biggest issue (other than the fact it was making noise) was the bolt pattern was 4.25" rather than the original 4.5". The previous owner had elongated the holes in the rims to make them fit then used large flat washers to make sure it wouldn't fall off. Not the safest way to do things. I was able to locate a 62 Ford Falcon / 3.50 ratio rear end along with 2 stock rims to replace the modified ones. When I pulled the cover to check the 'new' rear end, I was surprised to find it was in really great shape! I replaced the wheel cylinders, brake line, brake shoes, and brake hardware. I also had to modify the driveshaft as the 'new' rear end had a different size u-joint and the shaft needed to be just a tad longer to fit correctly. Pretty simple job to replace it. Took about 1 hour and it was in. During this I found out the shakel bushings in the springs were shot so I ordered some and will install them later. Here's a picture of the 'new' rear end.


Photos of my rust issues (bed)
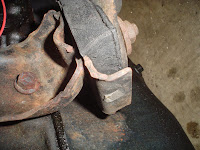
Here's some photos of the rust problems I'm dealing with. This area is normally covered by a plate that hides the damage. It's a very typical problem with many Rancheros. The plate actually covers the area that in a station wagon version of the chassis, would be the foot area of the rear seat. Ford had to put the removable cover plate to give access to the upper rear shock bolts. From the factory these are 'sealed' however if the shocks are ever changed the seams will leak. Once it starts you can't see the water sitting in the lower area and the rust starts. My plan is to use a rust stop chemical that will coat the edges then pop rivet a sheet steel patch over the larger areas. This will then be covered with fiberglass. Finally the whole bed (and the area under the cover) will be painted with bed liner. I'm also going to 'seam seal' the patches so hopefully this will slow down the rust so I can get another 20 or so years out of the vehicle.


Where I am with the project
Here's a list of the things purchased so far. It also gives you an idea of the time line and the things replaced:
|
5-21-12 (pep boys) |
Bottle jack |
|
|
Lug wrench |
|
5-25-12 (american tire depot) |
2 front tires (175/70-13) |
|
6-5-12 (autozone) |
Front u-joint |
|
|
Rear u-joint |
|
|
Brown spray |
|
|
Twist in spring spacers (4) |
|
6-7-12 (C&G) |
FORD hood emblems (letters) |
|
|
LH lower door hinge repair kit |
|
6-12-12 (Autozone) |
Chrome paint |
|
|
Gray primer |
|
6-14-12 Lowes |
Brown “Gloss French Roast” |
|
6-15-12 (C&G) |
1/4” Tube Nuts |
|
|
Tailgate Handle |
|
6-20-12 Autozone |
Replacement Antenna |
|
6-23-12 Lowes |
2 cans “French Roast” brn |
|
|
Bondo hardener |
|
|
2” surface prep kit |
|
|
Rust stripper brush |
|
6-28-12 Hanks |
20 screws for door sill |
|
|
Gloss black spray paint |
|
|
Soft Metal buffing kit |
|
7-4-12 Lowes |
Fire Ext. |
|
7-11-12 Pep Boys |
Floor mats |
|
|
Rear speaker box |
|
|
Replacement coverage |
|
7-18-12 Autozone |
1 qt Bondo |
|
|
Plastic spreaders |
|
7-19-12 Hanks |
80 grit sandpaper |
|
|
Asst grit sandpaper |
|
|
3 cans Ace gray primer |
|
7-30-12 Hanks |
Chemical gloves |
|
|
Prep & Primer rust inhibitor |
|
|
10 each trim screws |
|
9-12-12 Hanks |
18x12 26 awg sheet metal |
|
|
Blue mask tape |
|
|
Flt Blk spray |
|
9-15-12 Lowes |
6 cans “french roast” spray paint @ 4.24 each |
|
9-20-12 Used parts from seller in
Canyon Lake |
Rear end, drive shaft, 2 wheels with tires, Tail gate emblem,
air cleaner,
|
|
9-30-12 Autozone (on-line) |
Rear diff gasket |
|
|
Axle flange gaskets 2 |
|
10-3-12 O'Reilly Autoparts |
Brake cable removal tool |
|
|
Rear brake hose/note:
had to rtn and replace with 73 maverick hose |
|
|
Rear brake shoes |
|
|
Drum hardware kit |
|
10-4-12 Autozone |
Rear brake wheel cylinders |
|
10-8-12 O'Reilly Autoparts |
Gear oil
|
|
10-12-12 Autozone |
Carb cleaner |
|
|
Exhaust flange gasket |
|
10-16-12 O'Reilly Autoparts |
Carb rebuild kit |
|
|
Trans rear seal |
|
10-17-12 O'Reilly Autoparts |
Fuel Filter |
|
|
Carb gasket |
|
10-17-12 Autozone |
Air cleaner gasket |
|
11-9-12 Autozone |
Acetone |
|
|
J-B Weld |
|
|
Nitrile gloves |
|
11-12-12 Autozone |
Antifreeze |
|
12-6-12 Ebay |
E-brake assy |
|
12-7-12 4 wheel parts Whsle |
Rear spring bushings both sides |
|
12-12-12 Ebay |
Rear u-joint |
|
12-12-12 Johns Mustang |
U-joint u-bolts |
|
12-19-12 Inland Empire DL service |
Modify drive shaft |
|
1-10-13 Autozone (gift card) |
Sun Super Tach |
|
1-28-13 Hanks |
2 cans flat blk spray paint |
|
|
72” 2x2 alum angle for bed |
|
|
Wire knot brush for grinder |
History of vehicle

I'm going to try to keep this up to date with my work progress on my 63 Ford Ranchero.
First off here's the history of the vehicle I started with:
1963 Ford Ranchero “Deluxe”
Purchase date: 5-19-2012
Previous owner: (the guy across the street)
Eng: 75 ford 250 cu in inline 6 (from
Ford Granada) update 8/16/12 based on the block casting numbers
(D3DE6015DI) it appears the
engine is from a 73 Ford Maverick.
Carb: Carter model YFA
Trans: C4 Automatic 3 spd.
(note: car originally came with a 160
cu in 6 cyl and 3 spd standard trans).
Body: 66B (Ranchero deluxe bench)
Mfg Loc: San Jose, CA
Mfg date: 05M (December 5th
1962)
Original color: “M” (Corinthian
White) Current color: 'Coco Brown'. (Note: Rust-oleum Stops Rust
“French Roast” 12 oz spray cans from Lowes match color pretty
close!)
Instrument panel: based on photos on
the internet it's from a 63 Comet.
Axle: “2” (3.10) NOTE: rear
end has been replaced with something with 4 ¼ center spacing.
stock wheels: 4 on 4 1/2” ctrs 13”
diameter / 5” wide / 3.5” backspace.
Update: Old Rear axle code: WGF AJ 7GB
Bobcat, Pinto 77-78 / 2.73
ratio / 6.57 ring gear dia / 23 spline axle
2 73 67 229A
New rear end info: Code C2DA 4003
62 Ford Falcon / 3.50 ratio
/ 7.25 ring gear dia.
C542 3.50 2A8
rear brakes: 9 x 1.50 brakes
rear brake hose 1970 falcon wagon.
109.5-inch wheelbase and 181-inch
length. The coupes and sedans were 70.5 inches wide and 55 inches
tall with a 6.3-inch ground clearance. The coupes and sedans had a
curbside weight of 2,674 lbs.
Subscribe to:
Comments (Atom)